|
Cameras: controls and settingss |
||
| Written By Cameraman Jim: http://www.sigma-2.com/camerajim/index.htmm | ||
Selecting a CameraSelecting a CameraThe good news is you don't need an expensive, high-resolution camera for ebay photos. If you're using eBay Picture Services to post your photos, for best results, they recommend uploading an image with a minimum size of 1024x768 pixels. That's a lot less than one megapixel, which almost any digital camera today can exceed. If you host your photos somewhere other than on eBay, you'll probably want to resize them to 640x480 or less. So, when selecting a camera for eBay use, other factors are much more important than the camera's sensor or image size, including close-focusing ability, ease of use and good handling characteristics. My Guide, "Selecting a Camera for eBay Photos" has more about this subject, plus a few model recommendations... Basic Camera Controls and SettingsI can't stress enough how important it is to know your camera and its controls. That means you'll have to read the instruction manual. These are the features you should look for in the manual, regardless of brand name....
Turn that Flash Off!I've already discussed why you want to set the camera resolution low for ebay pics and the importance of close focusing (that macro setting). But what about those other settings? The reason you want to disable the built-in flash on your camera is because it is just about the worst sort of light for product pics. Direct flash makes your objects look 2-dimensional and it also glares back at you from any shiny surface.
White Balance Control — Getting Accurate ColorsThe white balance actually controls color temperature balance. Every type of light has a color temperature and almost every digital camera also has an automatic white balance feature, to try to adjust for this. That's fine for snapshots, but product photos are more demanding, so you'll need to learn how to preset the white balance to match the type of light you're using (daylight, shade, tungsten, fluorescent).
Exposure Control — Correcting Light & Dark PicsThe EV or exposure compensation control can be very important for an accurate exposure, especially if you are shooting a predominantly light or dark subject. Photography board regular dainisjg explained the problem very well with this demonstration (no political agenda intended by the subject)... "A camera meter tries to set an exposure setting based on an evenly balanced scene of lights and darks. If there is too much dark in a scene, it will overcompensate and the image will be too light; if there is too much white in a scene it will overcompensate again and the image will appear too dark.
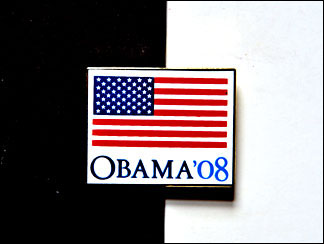
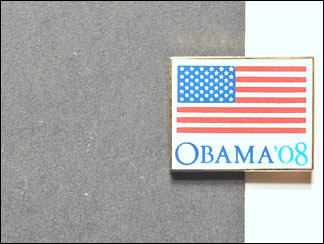
The following image was shot on a half black and half white
background using the same amount of light and auto exposure:"
"There is no such thing as your photos are too dark because you don't have enough light. You could have tripled the amount of light on that last photo and the meter would still think 'Whoa, way too light. I had better darken down a bit' and you would still get a too-dark photo. I have taken photos in extremely dimly lit situations where I had to leave the shutter open for several minutes but still got a good photo." Thanks, dainisjg. The photos above used the camera's auto exposure, but the results varied dramatically because of the ratio of dark and light in the scene. The remedy for those overexposed and underexposed images is the EV or exposure compensation control. If the photos look too dark, set this control for a positive (e.g., +1.0) value. If they are too light, set the control for a negative (e.g., -1.0) value.
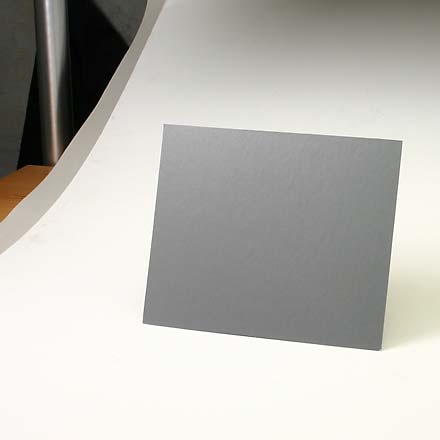
Using a Gray Card for The Most Accurate Colors and Exposures
A simple tool which can help you get more accurate exposures
is a gray card. Such a card is printed to a precise and
neutral value of 18% gray (white = 0% and complete black =
100%). Here's one in use on my ebay table... Even the most basic digital cameras will then let you find out what combination of shutter speed and lens aperture was used for that image. That info is usually displayed when you review your picture. You can then set the camera in its manual or semiautomatic mode for that same combination of shutter speed and aperture. After that, every shot you take with the same lighting will be exposed exactly right. |