|
In this Guide, I'll discuss clothing and fashion
photography, with special emphasis on hard-to-shoot black and
dark items.
A lot of the questions I get on eBay discussion boards have
to do with clothing photography. For the most part, this isn't a
difficult photo subject, as long as you pay attention to proper
color balance and exposure.
The lighting is simple, since it follows the rules for good
portrait lighting. In most cases, what you want is a main light
— which can either be diffused or direct — and a second fill
light or reflector to cut the depth of the shadow areas.
Photographic Backgrounds
As eBay items go, however, clothing tends to be large, so the
matter of backgrounds gets more important. These backgrounds
don't need to be complex. Even a simple white sheet or large
piece of fabric hung from a rod can do fine.
You could, of course, get more professional-looking results
with a seamless white paper background. That's what fashion
photographers often use in their studios and even on location.
These aren't expensive and I'll show and discuss these in a
minute.
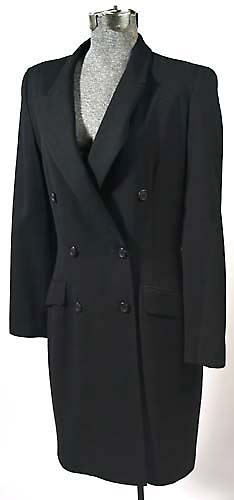
Dark Clothing Photography
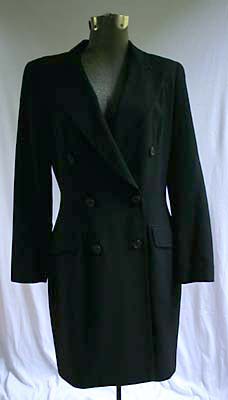
In my examples here, I'm going to be showing dark clothing,
because that seems to be a challenge for many eBay clothing
sellers. When looking at listings for black clothes, what I
often see are either washed out gray clothes or featureless
black blobs, with almost no hint of shape or texture, like
this...
I'm going to show you how to deal with that, but first, let's
go back to the window to look at a simple, basic clothing setup.
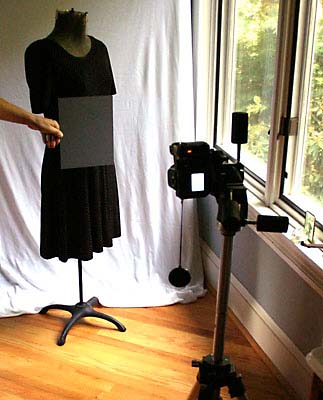
In the setup shot below, I've hung a large white muslin
fabric from two background poles. The background poles I'm using
(Bogen Autopoles) cost about $100 for a pair, but you could just
as easily do the same thing with fabric draped over a wooden rod
hung from the ceiling or a wall.
Here, I let the folds of the fabric show. If you don't like
that look, you could stretch and tack the fabric down at the
bottom. Muslin is often used as a photo background because it
drapes so well and doesn't wrinkle a lot.

There are two other important elements in that setup: a
tripod and a mannequin/dress form.
Tripods Make Sharp Photos
What most people think is an out of focus shot is very often
blurring caused by very slight camera motion. Either natural
window light or low-wattage indoor lighting can result in fairly
slow shutter speeds. A slightly shaky hand or even the beating
of your pulse can cause motion blur.
A tripod is almost always important, but it becomes essential
for clothing photography, where you're often shooting while
standing at a decent distance from your subject.
Mannequins Exhibit Shape and Drape
I also think a mannequin or dress form is important if you're
going to sell clothing on eBay because that's how you
demonstrate the shape and drape of the clothing.
Live models can also be a good idea, but eBay clothing
sellers disagree on when this is appropriate. Some say it's OK
if you're selling vintage clothing, but not so acceptable for
new clothes, when you want to assure buyers that the clothing
has never been worn.
[A digression: I understand that children's clothing is often
shown on ebay laying flat and that seems to be OK with both
buyers and sellers in that category. However, if you're selling
adult clothing, I think it's better to avoid the "body vaporized
up by aliens" look of clothing lying on the floor.]
Determining Camera Exposures with Dark Clothing
In dealing with dark clothing, it is important to get your
exposure on the money. Unfortunately, you can't always rely on
the auto exposure control on your camera to do that for you.
If you followed my information about exposure in the second
of these Guides
(Camera, Controls & Settings), you'll know automatic
exposure cameras expect an average scene, with average amounts
of dark, light and in-between shades. We hardly have that here,
with a dark dress on a white background, so the camera gets it
wrong and underexposes or overexposes.
You can use the exposure compensation control on your camera
to adjust for this, adding or subtracting exposure until it
looks right. Or, you could use a photographic gray card, to
measure the exposure.
Using a Gray Card for Accurate Camera Exposure
Again, going back to Part I of the workshop, a gray card is
calibrated to have the exact 18% gray value all automatic
cameras try to find. Such a gray card is cheaply available at
your local camera store or here on eBay and I recommend getting
one.
Here's how I'd use it here, with an assistant holding one in
front of the dress I'm going to shoot...
Zooming in, look at a close-up of the card.
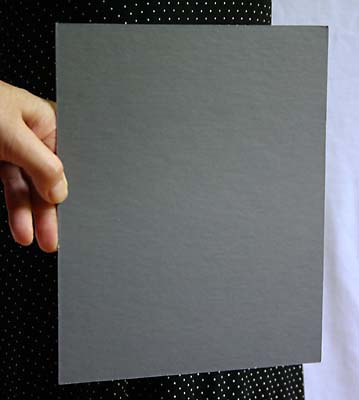 Reviewing that photo on my camera's LCD screen told me the exact
shutter speed and lens aperture the camera used for the
close-up. I then switched my camera into manual exposure mode
and set the shutter speed and aperture for these values.
Reviewing that photo on my camera's LCD screen told me the exact
shutter speed and lens aperture the camera used for the
close-up. I then switched my camera into manual exposure mode
and set the shutter speed and aperture for these values.
That might sound like a lot of trouble, but that is the last
time I will have to worry about exposure, as long as I use the
same lighting setup. Every shot I take from then on, whether of
a dark item, a light one or anything else in between, will be
exposed just right.
Here's the black dotted dress, shot using this technique...
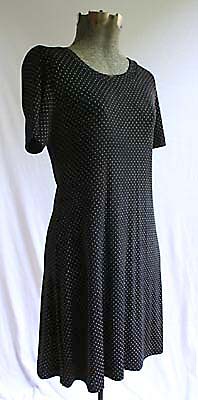
Using a Photographic Reflector to Lighten Shadows
That shot has a full range of tones, from jet black to pure
white, but I wasn't totally satisfied, because the shadows were
too dark on the left side. So, I added a reflector, in the form
of a sheet of posterboard held by an assistant...

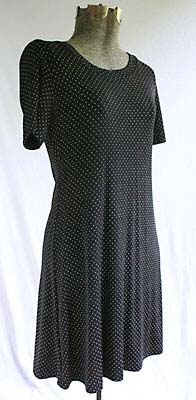
This gave me what I think is an improved image...
A Possible Moire Effect
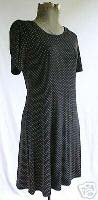 You might notice some wavy lines in this smaller version of the
photo above. This can happen when ebay reduces the size of your
photo, causing what is known as a moire effect. This
happens when two patterns overlap and interfere with each other.
In this case, the patterns are the dotted pattern of the cloth
and the pattern of pixels in the image. You might notice some wavy lines in this smaller version of the
photo above. This can happen when ebay reduces the size of your
photo, causing what is known as a moire effect. This
happens when two patterns overlap and interfere with each other.
In this case, the patterns are the dotted pattern of the cloth
and the pattern of pixels in the image.
The only solutions for this problem are to shoot at different
distances or angles, to blur the image or to use a larger image
size. Unfortunately, as of this writing, ebay limits the size of
photos in certain instances.
A Studio Lighting Setup for Clothing Photos
Now, let's go to a studio setup, instead of using window
lighting. Here, I'm using a roll of the seamless white paper I
mentioned above. This one is 53" wide and 12 yards long, but you
can get it in 8-foot or 12-foot wide rolls, too. The 53" size is
cheaper (about $20) and lots easier to handle around the house.
Savage is a good brand name to search for.
Once more, I'm using my Bogen Autopoles to hold the paper,
but you put a roll on a wooden dowel or metal rod and then hang
that from a ceiling or wall.
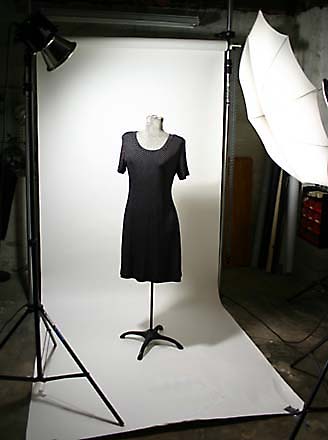 For my lighting, I'm using two tungsten lights in small
reflectors. The main light on the left side is placed high, so
any shadows it throws will fall behind and to the right of my
subject.
For my lighting, I'm using two tungsten lights in small
reflectors. The main light on the left side is placed high, so
any shadows it throws will fall behind and to the right of my
subject.
The other light is shining through a translucent photographic
umbrella. This isn't a very expensive accessory and it's one I
think you might consider if you sell a lot of clothing. It
produces a very soft, diffused light that's very flattering to
many subjects. Or, you could substitute any other diffusion
material, such as a plastic panel from a fluorescent light.
The light with the umbrella is being used here as a fill
light, to help cut the shadows. With a fill light, the idea is
to have a weaker light than the main light. If you have two
lights of about the same strength, you can moving the fill light
about 50% further away will do the trick.
This was the result from my two-light studio setup...
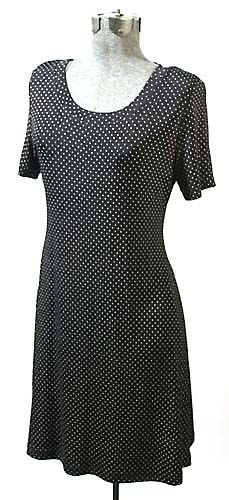
Notice how this gave me a pure white background. Some people
get this by painstakingly erasing their backgrounds with photo
editing software, but this shot is unedited, except for
resizing. If I wanted to get a complete "floating" look, I guess
I could have erased the mannequin's support post at the bottom.
And do you remember that black blob of a coat dress I showed
earlier? Here's how it turned out with this indoor lighting
setup...

|